Step-by-Step Instructions for Breast Self-Examination
Taking charge of your breast health doesn’t require any special equipment or medical training. All it requires is to know the correct procedure, consistency, awareness, and a few minutes each month. The guidance below is organised into three parts to make it as easy as possible for you to follow.
First, a screening timeline by age group, so you know exactly when to start, how often to check, and when to involve a doctor based on where you are in life. Second, a step-by-step walkthrough of how to examine your breasts at home, with clear instructions on what to look and feel for.
And third, what to do next if you notice a change, including the tests a doctor may recommend and what each one involves, so you are never caught off guard or unsure of the next step. Whether you are doing this for the first time or making it a regular habit, this guide will walk you through everything you need to know.
Screening by Age Group
- Age group 20–29 years: Monthly BSE + clinical exam every 3 years. No routine mammogram needed; ultrasound if a lump is found.
- Age group 30–39 years: Monthly BSE + clinical exam every year. Ultrasound for symptomatic women or palpable abnormalities.
- Age group 40-49 years: Monthly BSE + annual CBE + mammogram every 1–2 years, depending on risk profile.
- Age Group 50 years and above: Monthly BSE + annual CBE + mammography every 2 years
- High-risk women with a family history, BRCA mutation, early menarche, late menopause and women who are obese.

Must know fact: Your breast tissue is unique to you
Not all breasts feel the same during a self-examination, which is completely normal. One key reason is breast tissue density, which refers to the proportion of glandular and connective tissue compared to fatty tissue in the breast. Women with denser breast tissue may find their breasts feel lumpier or firmer overall, making it harder to detect new changes during a self-exam.
Breast density is largely determined by your genetics, which means it is something you are born with, passed down through your family, and not something you can change through diet or lifestyle. This is why two women of the same age can have very different self-exam experiences, and why a lump that is easy to feel in one woman may be much harder to detect in another.
Here is a step-wise guideline to examine the breasts for any abnormal signs:
Step 1: Choose a Regular Time
Do your breast self-exam at the same time each month. It’s best to perform the exam a few days after your period ends, when your breasts are less likely to be swollen or tender. If you no longer have periods (hit your menopause), pick the same date every month at your convenience.
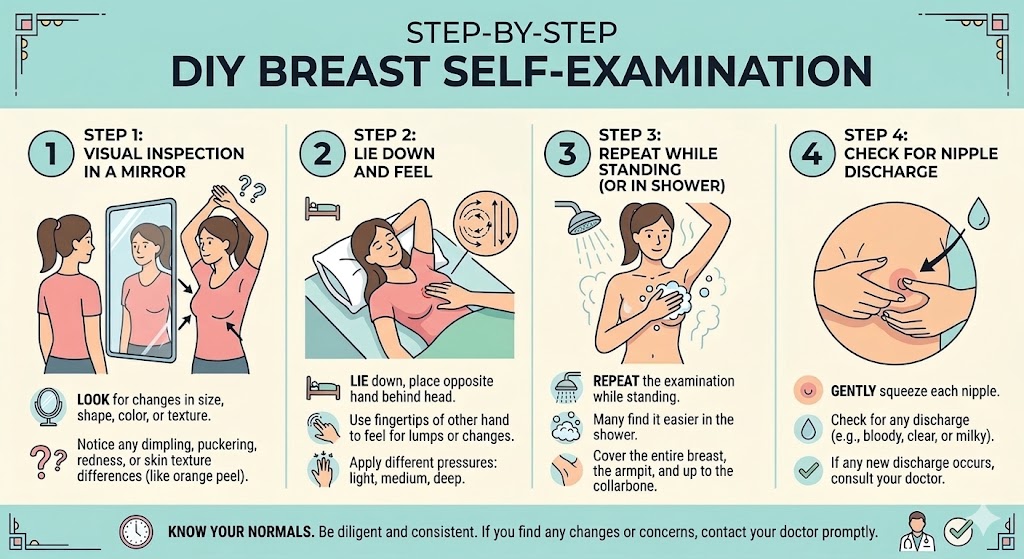
Step 2: Look in the Mirror
- Remove your clothes from the waist up, then stand in front of a mirror with your arms relaxed at your sides or on your hips.
- Look for any changes in the shape, size, or symmetry of your breasts.
- Check for dimples, puckering (wrinkling or drawing in of the skin, or an orange-peel appearance), redness, or any changes in the skin or nipples.
- Raise your arms above your head and look again for these changes.
Step 3: Check for Fluid
Gently squeeze each nipple to check for discharge, such as watery, milky, yellow fluid or blood.
Step 4: Feel Your Breasts While Lying Down
- Lie down and place a pillow under your right shoulder. Place your right arm behind your head.
- Using the pads of your three middle fingers on your left hand, move them in small circles over your right breast. Cover the entire area, i.e., from your collarbone to the top of your abdomen, and from your armpit to your cleavage.
- If you have trouble using or sensing with your finger pads, try using your thumb or the palm of your hand instead.
- Use light, medium, and firm pressure to feel all the breast tissue.
- Repeat these steps on your left breast, using your right hand.
Step 5: Feel Your Breasts While Standing or Sitting
Many women find it easiest to do this part in the shower, as wet and slippery skin makes it easier to feel changes. While standing or sitting, follow these steps:
- Place your right hand behind your head or on your hip to help spread the breast tissue.
- Using the pads of your three middle fingers on your left hand, apply the same small circular movements you used while lying down — covering the entire breast area from the collarbone down to the abdomen, and from the armpit to the cleavage.
- Use light, medium, and firm pressure across the entire area.
- Pay particular attention to the armpit area, as lymph nodes are located here and can sometimes indicate a concern.
- Repeat on the other side — left hand behind your head, using your right hand to examine your left breast.
If you are doing this in the shower, avoid using soap directly on the area you are examining, as too much lather can reduce your ability to feel subtle changes.
Step 6: Know What to Look and Feel For
- A breast lump or thickening, often without pain.
- Change in size, shape, or appearance of your breast.
- Dimpling, redness, pitting, or other skin changes (including puckering).
- Change in nipple appearance or areola (darker circular area of skin surrounding the nipple at the centre of the breast).
- Inward turning (inversion) of the nipple into the areola.
- Abnormal or bloody discharge from the nipple.
“Do not ignore a painless swelling or lump. A lump that does not hurt is not a sign that everything is fine — in fact, most breast cancer lumps are painless. Pain is often a late symptom. When in doubt, always get it checked.” |
Step 7: Contact a Cancer Care Provider if You Notice Changes
If you notice any lumps, changes, or anything unusual, do not panic. Most breast changes are not cancer, but it’s important to contact your gynaecologist/healthcare/cancer care provider to get it checked.
A word of caution: If you find a lump, observe whether there is any pain. Painless lumps are more concerning than painful ones. Pain is often a late symptom of cancer. Do not ignore a lump just because it does not hurt. Do not rely on advice from friends or family; only a doctor can determine if a lump is benign (non-cancerous) or malignant (cancerous) and if it needs further medical investigation.